Sometimes this is the first thing you notice-
If you have a bird away from the flock for an extended period of time, to the flock
that bird is dead and gone-
Injuries
’My Chicken Is Looking Sick’

Velvet Sparrow
If you suspect illness, please read the ENTIRE ‘Health’ section on my site–I go into much more detail. If you think your chicken needs a vet, CALL ONE! Info on this site is NOT meant to take the place of proper veterinary care, and I assume no responsibility for your use of the information on this site.
This is by no means a complete and comprehensive list of everything that can go wrong with your chickens!
The Chicken Mantra–learn it, love, it, live it:
‘If it is possible for a chicken to hurt themselves on something, somehow they will find a way.’
What Do I Do?!
With ANY injury or illness, it is imperative to keep your bird warm and quiet. Chickens are tough, but are, after all, still birds and shock can kill your bird quicker than an injury or illness can. One of the first things you should do is to get the bird to someplace warm (a cardboard box with a heating pad set on 'low') and quiet (away from other birds, kids, barking dogs) and offer it free choice chicken feed and unflavored electrolyte solution to drink. Pedialyte is a liquid electrolyte solution for human children in the baby aisle at the grocery store or mix your own following the recipe here. Unflavored is best for chickens since they tend to refuse fruit flavored water.
Bleeding Injuries
I keep a little bottle of a powdered medication called "Kwik-
Any time you have a bird that is bleeding, isolate it and keep a watchful eye on it even after the bleeding has stopped. Other chickens can and do peck at wounds and get them bleeding all over again, or the injured bird will reopen a wound when preening. These things, done quickly, can save your birds' life! Keep bird isolated until injuries heal to reduce risk of flockmates pecking open wounds or infection.
Bleeding Feathers
Usually if a feather has been broken off and is bleeding, it means that it was a
'blood feather'-
Bleeding Spurs
Spurs grow like fingernails and are molted periodically, although not as frequently as feathers. Roosters will once in a while naturally shed a spur or break one off by getting it caught on something, sometimes resulting in a bleeding stump where the spur used to be attached to the leg. While this is natural and normal (the spur you see on the outside is basically a ‘cap’, when molted it leaves behind a shorter stump still attached to the shank of the bird), it takes a few days for this stump to harden off by being exposed to air, meanwhile it can be uncomfortable for the roo and may bleed excessively if other birds peck at it or it gets rubbed against perches and the like.
Apply a powdered coagulant (which will sting!) only if necessary–if it is bleeding
excessively and you are worried, and either keep your roo boy isolated for a few
days if the others won’t leave it alone, or maybe create a perch that is kind to
the new spur buds-
Here is one of Phoenix’s molted spurs…
Crop Surgery
Shock
A bird in shock will be dazed, staring blankly, sitting or lying down, gasping or have labored or shallow breathing. Their eyes may be closed and they make look near death and be unresponsive. Usually a bird suffering from shock has suffered some trauma, either due to a fight with another bird or a predator, or because it got caught in something like a wire fence. Some chickens tend to peck at an injured or sick bird, causing further distress. Shock is one of the quickest, surest killers of chickens and needs to be treated as quickly and calmly as possible. Chickens are very susceptible to shock and nearly all traumatic injuries result in it. If you suspect shock at all, treat for shock immediately, it can’t do any harm. Better safe than sorry.
Remove the bird to a warm, quiet place away from other chickens, kids, barking dogs, etc. Offer or give it unflavored electrolyte solution to drink.
Injuries To Comb, Wattles & Face
Chickens tend to get injuries to their faces because it is both where other birds
peck them first, and since chickens don't have fingers, they tend to poke their noses
into whatever it is they are investigating. Also, birds with large combs and wattles
are more easily damaged by frostbite than birds with small or no combs or wattles.
When roos fight they go for their opponents' face and eyes, so cuts there are more
common. My vet tells me that a torn-
You need to guard against shock with any injury. If the injury is severe or life-
Egg Binding
There are a few definite signs of an egg-
I keep my bird warm and quiet–place her on a towel-
You can also take a warm, wet washcloth and wring it out well, then hold it against
her vent and undercarriage. The heat relaxes the muscles, gets the blood circulating,
will help her pass the egg, relieves pain and just plain feels good. The moisture
help moisten and lubricate her vent a bit. Do this every few minutes. Don't soak
her feathers and chill her, though! Wet feathers siphon away much needed body heat.
You can also take a Q-
Removing An Egg From An Egg-
A vet is trained to squeeze in a certain spot on either side of the pelvic bones (timing it with the hen's own push to lay the egg) from the outside to pop an egg out, or reach inside a bird, pop the egg and then either extract it or allow the hen to pass it. Sometimes the vet will also give your birds medication to help. Only someone experienced at this should try popping and extracting an egg though, as it can be harmful or fatal to the bird if it isn't done right.
Having said all that, I DID have an experience with an egg-
Naturally this happened when my vet was closed. I discovered this little hen at 6PM
(hens normally lay eggs by 10AM) when I went out to feed the chickens. She was the
only one who did NOT come running when I called-
I maintained the heat, massage, oiling her vent, oral calcium mixture and even oiled
up my finger and tried to reach in and pop the egg out that way (I think we are engaged
now, by the way). No luck. This went on until 8:30 that night, by which time the
hen was only trying to lay the egg once in a while and was looking decidedly distressed
and weak. We knew we had run out of choices and it was time to get that egg OUT.
I decided the tool to use was a small, sharp awl which could easily puncture the
egg without sliding off. Awls look kind of like a small screwdriver, with a sharp,
needle-
With my husband firmly holding the hen on my lap so that she could not move, and a large, shallow dish ready under her, I supported the hens' abdomen (holding the egg in place) and parted her vent opening with the fingers of my left hand. Then I gently placed the point of the awl on the eggshell, making VERY sure that it could not slip and keeping the tool in my grip much like a pen, with only a short amount of the sharp end exposed. I pressed firmly yet gently and the tool readily pierced the egg. I then had to gently move the very tip of the awl (still in the same grip with only a tiny portion of the sharp end exposed) around, working the edges of the hole and breaking little pieces of the shell away to expand the hole.
The hen was so weak that she couldn't even try to push anymore, so I tried to push the egg out from outside her body, which did not work. I had to enlarge the hole in the shell a bit, then work the tip of my finger inside the shell (I knew I would only have one shot at this). I hooked my fingertip firmly inside the egg and pulled it out of her in one motion. The dish caught the egg and it's contents, and after I released the hen (who looked very relieved but tired) I reconstructed the shell fragments to make sure that none of the egg had remained inside her. I'm confident that 99.9% of the eggshell was removed, and we could not have hoped for a better outcome. It turns out that the egg was sideways inside her, in addition to being very large. After a night indoors on the heating pad, a good rest and a hearty breakfast the next day, the hen was allowed back outside with the flock and seems fine.
I'm not saying that you should try it, and I realize that we were VERY lucky to have
had such a successful outcome. But we had reached that 'last resort' stage, and we
knew she was dead if we didn't try. It was truly nerve-
I have since successfully used this same technique to remove eggs from two other
egg-
The Crop–That Lump On The Front Of Your Chicken
And What It’s Condition Means
Chickens have a different digestive system from humans. Instead of food going to
directly to a stomach, it is first stored in a pouch-
Nutrena has a page with a great quick & dirty explanation of a chicken’s digestive tract, with helpful drawings:
URL: http://www.nutrenaworld.com/knowledge-
You can see and feel the crop on a chicken, after they have eaten well it’s that
golf-
A crop that is large, hard and doesn’t empty may indicate a dangerous crop impaction, especially if the chicken’s breastbone (keel) feels sharp to your hand and they have lost breast meat. An overly skinny breast and sharp keel are usually pretty serious indicators of a sick chicken. So if you have a chicken with a full, hard crop that seems to be starving and wasting away, it might be a crop impaction, especially if the chicken has had access to long strands of grass or other green matter to eat. A bad, sour smell emanating from the chicken’s beak from rotting vegetable matter is another clue.
A crop impaction is when a chicken eats something, usually long strands of grass or possibly a foreign object, that blocks up the exit of food from the crop into the rest of their digestive tract. One way to test for a crop impaction is to isolate the chicken overnight, removing food and water. First thing in the morning, check their crop–it should have emptied overnight. If it is still just as large and hard as it was the night before, your bird may have a crop impaction. Regardless, once you’ve checked your bird, return food and water to it. An impacted crop means your bird is actually starving to death because food isn’t getting through, and may require surgery to solve. You have to treat a crop impaction immediately, either yourself or by taking your bird to the vet for crop surgery.
If the impaction seems minor or you’ve caught it early, you can try getting the bird
to clear it itself by giving it orally an eyedropperfull or two of olive oil, then
massaging their crop vigorously with your fingers–you want to work that oil into
the stuck mass and try to get it to break up and move along. Really massage well,
don’t be timid, as the the clock is ticking and the only other option after this
is crop surgery and your bird needs help NOW. Isolate the bird so you can watch
it, but keep water or electrolyte solution in front of it at all times to drink.
A pureed, pudding-
If the blockage doesn’t clear, it’s time to take your bird to the vet or perform crop surgery yourself.
Sour Crop & Slow Crop
I have had to do crop surgery on a favorite hen with an impacted crop, just once, years ago. It was a situation where she had gotten into some long grass and eaten a big wad of long strands along with a foreign object–it all balled up and effectively blocked her up. My vet was out having emergency surgery himself and I could not find another vet that would even SEE a chicken, so I had no other option. I also am a medical professional and have had years of experience assisting with various dental surgeries, so luckily I had that knowledge and experience on my side as well. Skitters was also a total pet and loved to be held and petted, so she was very tame and calm.
I’m going to include the procedure I used here–again, it was a last-
Unfortunately, this hen was extremely weak and skinny by the time I did the surgery and while the surgery was a success, the patient later died. Her name was Skitters, and she was a Cochin mix and always looked fat and fluffy, so I didn’t notice her condition in time. Also, in trying to help her to clear the blockage herself and hoping to avoid surgery, I waited too long before finally doing the surgery.
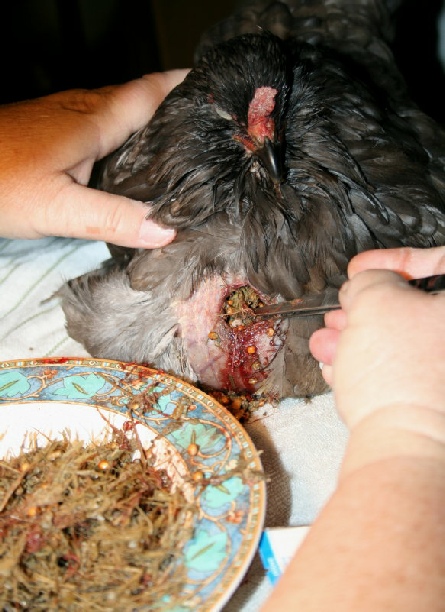
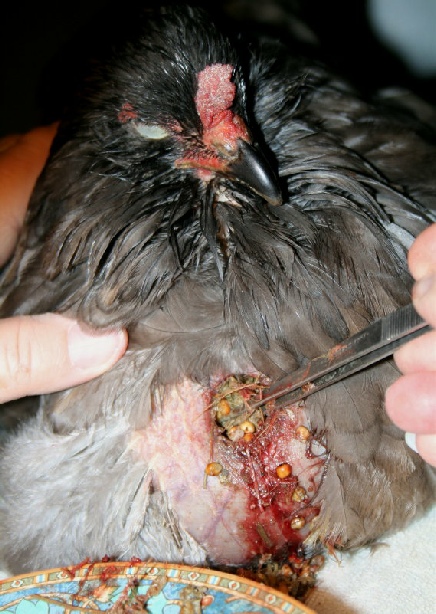
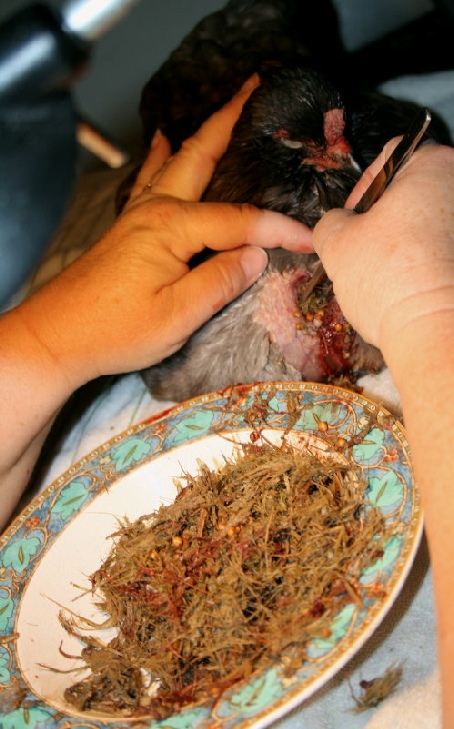
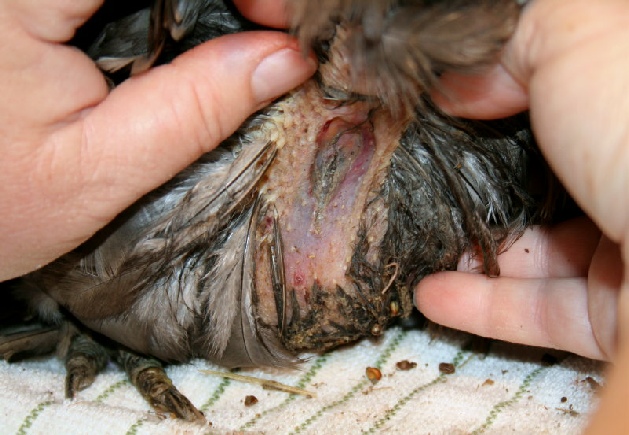
Some of these pictures may be disturbing since they show surgery, but none are grossly bloody. But the pictures are VERY necessary to illustrate the procedure, and if you are thinking of doing this surgery at home yourself, they may help.
I relied on Robert Stroud’s book, Stroud’s Digest On The Diseases Of Birds, for the technique I followed and the only advice I could find from someone who had performed the procedure themselves.
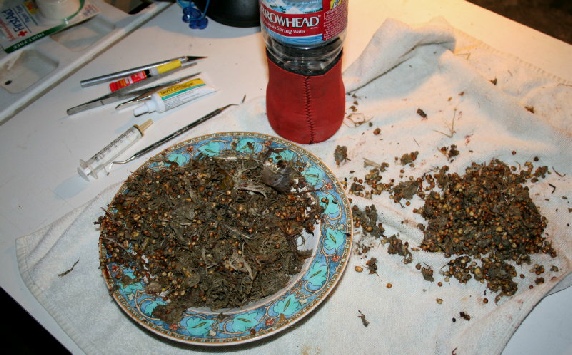
I started off by gathering any supplies I thought I might need: an Exacto knife with a pointed blade, rubbing alcohol wipes, various cotton swabs & gauze pads, paper towels, a bottle of water, a good strong light, a large worktable covered with a towel, several types of tweezers, an irrigation syringe, several types of first aid tape including paper tape, a needle and thread for suturing material, a dish to put the removed material in, a tube of triple antibiotic cream and a tube of cyanoacrylate glue (Crazy Glue). I sterilized everything I could and had oral bird antibiotics on hand to dose Skitters with after the surgery. I also had my daughter and husband standing by to help if needed. It’s better to have too may supplies rather than having to stop in the middle and run and get something, so some of these things I ended up not needing after all. I went through the procedure in my head first from start to finish to think of anything I’d need.
What I needed to do was to make two vertical incisions about 1 inch in length at the top of the crop on the front of Skitters. The incisions are at the top of the crop because that is the area that will be under less stress once the bird is eating again so will be less likely to reopen. One incision through her skin, the other through the crop wall. I would then be able to reach in, remove the impaction and close her up again. Strouds book suggested that the skin incision be made first, then the crop grasped and turned a bit before making the second incision–this way, after the impaction was removed and the crop released, it would rotate back into position so that both incisions would no longer be in the same spot. Stroud suggested that this would eliminate the need for suturing either wound and would help avoid scar tissue adhesions. Stroud also reported that chickens did not seem to feel either the feather plucking or the incisions.
The first step, once I had everything set up and ready to go, was to put Skitters on the table and pluck some of the breast feathers at the surgery site. This is necessary in order to be able to see and clean the incision site, and so that feathers don’t get inside the incision while it is healing. I planned on about a 1 inch incision, so I plucked an area about an inch in diameter all around it. Skitters had no reaction to the feather plucking, although I agonized over it plenty. I then thoroughly cleaned the area with gauze pads and rubbing alcohol.
Next was the hard part, making the first incision. I’d already decided that if she reacted with pain, I‘d stop. I located where I wanted my incision to be and while my husband held her, made the vertical cut. No reaction from Skitters! It bled a tiny amount, but much less than I expected. Following Stroud’s advice, I grasped and rotated her crop a bit–it was pretty much right there and I didn’t have to go digging around to find it–and made the second incision. Still no reaction from Skitters, she sat there enjoying getting petted.
 >
>
Jack’s Henhouse
 >
>
Jack’s Henhouse
 >
>
Jack’s Henhouse
 >
>
Jack’s Henhouse
After that I just started hauling all the nasty crop impaction material out through the incision hole, keeping my fingers braced to keep the incision open while I did. You can see the gunk I’d already removed in the bowl in this picture–the impaction was huge. The foreign object she had eaten was at the back/bottom of her crop where it drains into the proventriculus, and had acted as a very effective plug to keep everything she had eaten after that from being digested–it had all just backed up and stayed in her crop.
 >
>
Jack’s Henhouse
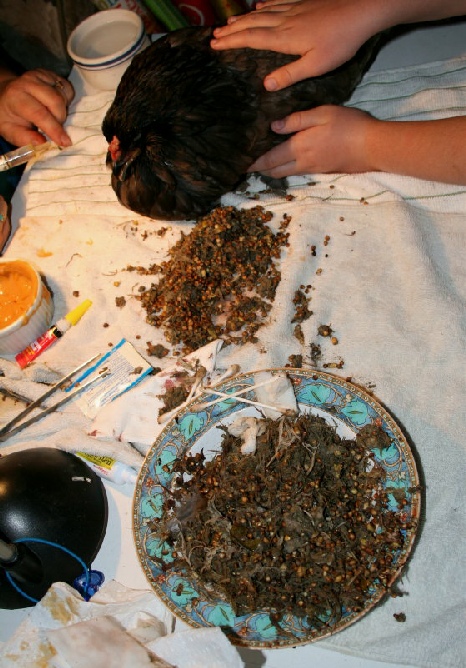
After the impacted material had been removed, her crop rinsed out and I’d flushed a bit of water down her throat to make sure everything was emptying into her crop OK, I released the incision site and after just a bit of gentle massaging, it returned to position–and just like Stroud said, the two incisions no longer lined up and both closed with no suturing. The area was again cleaned, a bit of triple antibiotic cream applied and Skitters was placed on the floor on a folded up towel in a warm, dark, quiet spot to rest.
I estimate that what I removed was almost the size of a softball. Like I said, I’d waited too long and caught the problem far too late. I still can’t believe that all that gunk was packed into poor Skitters’ crop, poor baby.
But while Skitters turned out to be too weak to recover, the surgery DID work flawlessly, so I’m including it here in hopes that Skitters may save some other chicken some day.
 >
>
Jack’s Henhouse
 >
>
Jack’s Henhouse
Sour crop is a different issue affecting the same organ–the crop. It is not an injury but instead is a situation where whatever the chicken has eaten has gone bad and is causing the food to basically start rotting or fermenting in there, and what is in the crop needs to either be removed or treated, massaged and gotten to be moved along in the digestive tract.
Usually this is caused by moldy feed or something a chicken has eaten–I once heard of a chicken given undercooked homemade bread dough, the sugar and yeast did their thing inside a warm chicken crop and made a very nasty situation for the bird.
Symptoms of sour crop include a very bad smell emanating from the chicken’s mouth, sometimes they will vomit up a bit of nasty, smelly fluid. The crop fails to empty aver the normal course of 12 hours or so. You can treat sour crop by handfeeding the bird a mixture of plain yogurt (calcium to help the crop muscle work) with active cultures (helps replace the good bacteria in the gut which aids digestion) and some olive oil for slip. Then vigorously massage the crop to break up the problem and incorporate what you just handfed into it. Isolate the bird and give it fresh water to drink but no food for now.
Watch the bird, check any poops it makes, repeat the handfeeding/massage until the crop empties and clears–if it does not or the bird worsens, take it to the vet. If the problem clears, feed your birds soft foods such as scrambled eggs, diced grapes and tomatoes, etc. for a few days until the crop gets working properly again. Going back to regular chicken food too soon may risk a repeat of the same problem or a crop impaction if the crop muscle is lagging in it’s function.
Some people suggest the extreme measure of holding your chicken by it’s legs in one hand, resting their breast in your other hand and lowering their head towards the ground while ‘milking’ the crop upwards towards the chicken’s head in order to expel the soured material that way. This is risky because the chicken may well aspirate the material and choke to death, but may work in limited, gentle bits to drain off some fluid. I have not tried this myself so cannot recommend it.
Slow Crop is simply a situation where there is neither a blockage or fermented food in the crop–it’s just kinda lagging and slow to empty. Sometimes this happens in older hens and the crop will become pendulous, flopping back and forth with every step the bird takes. While not particularly dangerous, it sure looks uncomfortable and you may be able to help. Handfeed or give the bird to eat a small dish of plain yogurt with active cultures & olive oil, then massage the crop to stimulate the muscle.
Spraddle Leg & Foot Breaks
Making A Shoe, Hobbles Or Splint
A vet visit is the first choice, but if you cannot, and you are treating an adult
bird with a non-
Sometimes a baby chick is hatched with foot or leg deformities. As chicks are quite rubbery when they first hatched, sometimes you can place a splint or shoe on the new chick and correct or at least partially correct the problem. Another cause of leg deformities in chicks is caused by running your chicks in the brooder box on a slick surface that they cannot get traction on, such as newspaper. Chicks MUST have traction or else they will very likely develop Spraddle Leg or foot deformities! If you need to make a splint or shoe, the thing is to do it RIGHT AWAY, the same day as hatch or as soon as you are sure there is a problem.
On the UPA (United Peafowl Association) site, great instructions for placing a chick with Spraddle Leg in a splint (also called hobbles or a chick splint/shoe), it also works with loot injuries on adult birds:
URL: http://www.unitedpeafowlassociation.org/PeachickOrthopedics.html
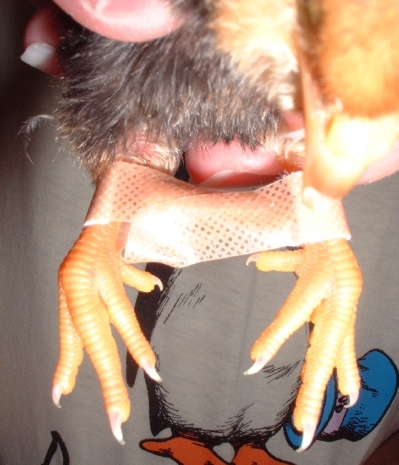
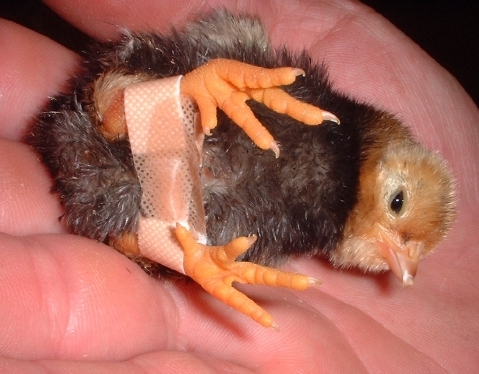
The chick below hatched with Spraddle Leg, her legs spread apart side to side and she was unable to stand or walk. In the pictures you can see that she still has her ‘egg tooth’, the hard tip that assists in hatching and falls off within 3 days of hatch. I immediately placed a splint to brace her legs to the correct angle until her legs ‘hardened up’ after hatch, about 2 days.
 >
>
Jack’s Henhouse
 >
>
Jack’s Henhouse
If you do need to make a splint for Spraddle Leg, you can construct one similar to
the one pictured here using a wooden matchstick and 2 bandaids. Blue painter's tape
from the hardware store also works beautifully-
You should now have a padded matchstick with a strip of bandaid hanging off both
ends. Peel the remaining backing off the adhesive strips. While your helper holds
the chick, use one hand to position it's legs and hold them there. Put the matchstick
between it's legs, on the shank between the ankle and the hock (knee), and wrap one
of the hanging bandaids around it's leg, being careful not to get any feathers stuck
to the adhesive. Stick the loose end of the bandaid to the matchstick to secure that
end, then repeat at the other end. Be sure that the chicks' legs are straight, pointing
forward and are the correct distance apart-
**IMPORTANT** The chick won't be able to walk or move with this on, so YOU need to place food right in front of it and not only make sure that it is eating, but protect it from the other chicks.
It should be able to sit down comfortably and NOT have to lie on it's back (the chick in the photo is just for the picture). Usually a few days to a week does the trick and you can take the splint off afterwards.
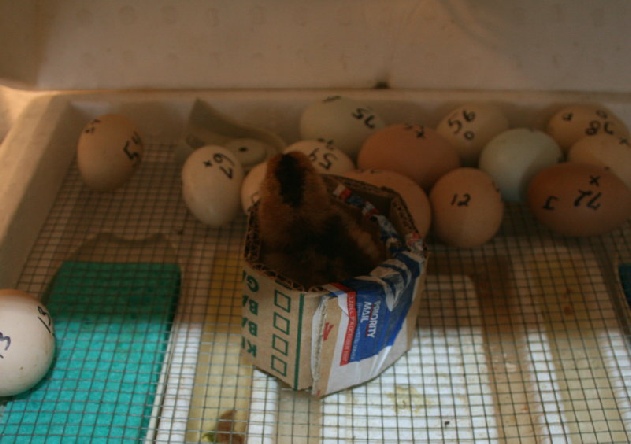
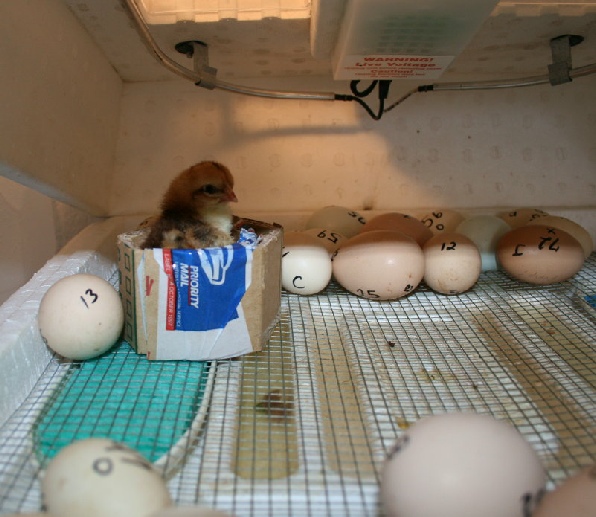
Another device that may work if a newly hatched chick has trouble standing upright is to…well…basically build it a little chick Dalek. This chick’s feet were fine, but it had enormous trouble remaining upright, beyond the point of normal new chick bumbleness. It was in severe distress from being on it’s back so often, so much so that I feared it would die. So I constructed a little cardboard corral for it. It was able to move about inside the incubator freely and after a few hours it was strong enough to where I could remove the chick from it’s little Dalek.
 >
>
Jack’s Henhouse
 >
>
Jack’s Henhouse
The Special Problems Of Crested Breeds And Crookneck/Limberneck
Crested breeds are birds with a crest of feathers on the top of their heads, such as Silkies and Polish. Since humans are always breeding for bigger crests on these fancy fowl, some crested breeds have actually developed a hole in the top of their skull, through which their brains protrude! There is a great article on it here (due to the site layout not linking properly, use the menu on the left to find it) entitled "Silkie Skull", along with a link at the bottom of THAT page to another page on crested fowl and cerebral hernias (with great info on how and why you should trim crested fowl a bit to help them see), make sure to read both pages:
URL: http://www.browneggblueegg.com/Article.html
Since Silkies and Polish in particular not only have the open skull but their feathered
crests can obscure their vision, sometimes they don't see another chickens' posturing
(lowered head and hackles flared, or standing tall and facing the other bird aggressively)
warning of a head peck coming. So they don't know to get out the way or duck, and
take a nasty peck to the top of the head-
Crookneck/Limberneck can also be caused by a nutritional deficiency, but in these
days of balanced nutrition chicken feed it doesn't happen very often-
Symptoms are the birds' inability to stand properly or lift it's head, backing up constantly, tucking it's head between it's legs, a drunken stagger, dragging it's head from side to side on the ground or flipping upside down. There are home treatments for Head Boinks that work well most of the time, but they are lengthy and the bird takes a lot of care and some handfeeding. Happily, I have used Dr. Stanford's Vitamin E/Selenium treatment with amazing success, several times on birds that I thought would surely die that ended up recovering completely. While he recommends the use of Prednisone with this treatment, I had no access to it and the Vitamin E/Selenium still worked.
It is important to be sure the bird gets enough to eat and drink while it has this problem. Birds with severe cases of Crookneck can't eat and drink enough to survive. You will need to gently place their head in the feed dish and carefully dip just the tip of the beak in water. Be careful not to dip too far into the water, and to not stress the bird while trying to help. If the problem is severe enough you may have to handfeed the bird for a few days until the Vitamin E/Selenium mixture has time to work.
Daily Dosage:
400 IU of vitamin E (one human capsule)
Selenium 50 micrograms (You may have to get a larger tablet and cut it in half or quarters)
Crush the Selenium into a fine powder. Take the Vitamin E capsule, poke a hole in one end with a pin, then squeeze the liquid out into a tiny dish. Mix the powdered Seleium into the Vitamin E liquid using a wooden matchstick or something similar. Hold the bird in one hand, with the other scoop up a small amount of the mixture, pry open the bird’s beak and place the mix inside it’s beak, allowing it to swallow it on it’s own. Feed the bird the entire mixture. Do this once a day for 7 days. Keep the bird isolated, warm and quiet so that the injury can heal.
This isn't an injury that heals rapidly. It takes medication and TIME. Results aren't instantaneous, but this treatment DOES work. I have seen dramatic improvement within a matter of days, and my recovered birds have gone on to live normal lives.

Enjoying the chickens? Has my site helped you?
Want to buy the chickens some goodies?
Click the button!

 >
>

